도움이 되셨다면, 광고 한번만 눌러주세요. 블로그 관리에 큰 힘이 됩니다 ^^
import seaborn as sns
import os , pandas as pd
import matplotlib.pyplot as plt
import re
여러 개의 데이터를 합치는 작업이 필요해서 진행
folder = "Weather_Aus_Vis_"
folder = "Income_Vis_"
folder = "Bank_Vis_"
folder = "Churn_Vis_"

Income_uni = ["9", "16" , "7", "15", "6", "5", "2", "41"]
Churn_uni = ["51", "3" , "2","2"]
Bank_uni = ["12","3","4","2","2","2","3","12","4"]
Weather_uni = ["26","16","16","2"]
if re.search("weather", folder.lower() ) :
    uni = Weather_uni
elif re.search("churn", folder.lower() ) :
    uni = Churn_uni
elif re.search("bank", folder.lower() ) :
    uni = Bank_uni
elif re.search("income", folder.lower() ) :
    uni = Income_uni
else :
    uni = []
    print('ERROR')
collections = []
for p_miss in p_miss_list :
path = "{}{}/PFC_Result.csv".format(folder , p_miss)
dd = pd.read_csv(path)
dd["miss"] = p_miss
dd.rename(columns={"index": "column"}, inplace = True )
dd = dd.drop("Unnamed: 0", axis = 1)
collections.append(dd)
PFCs = pd.concat(collections)
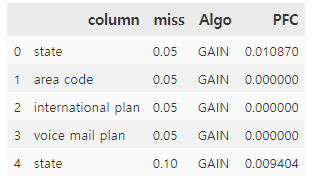
PFCs.head()
이것을 melt 해서 wide format을 아래와 같이 long format으로 바꿔줌.
이런 식으로 하게 되면, 한 그래프에 여러가 변수를 표현할 수 있게 됨!
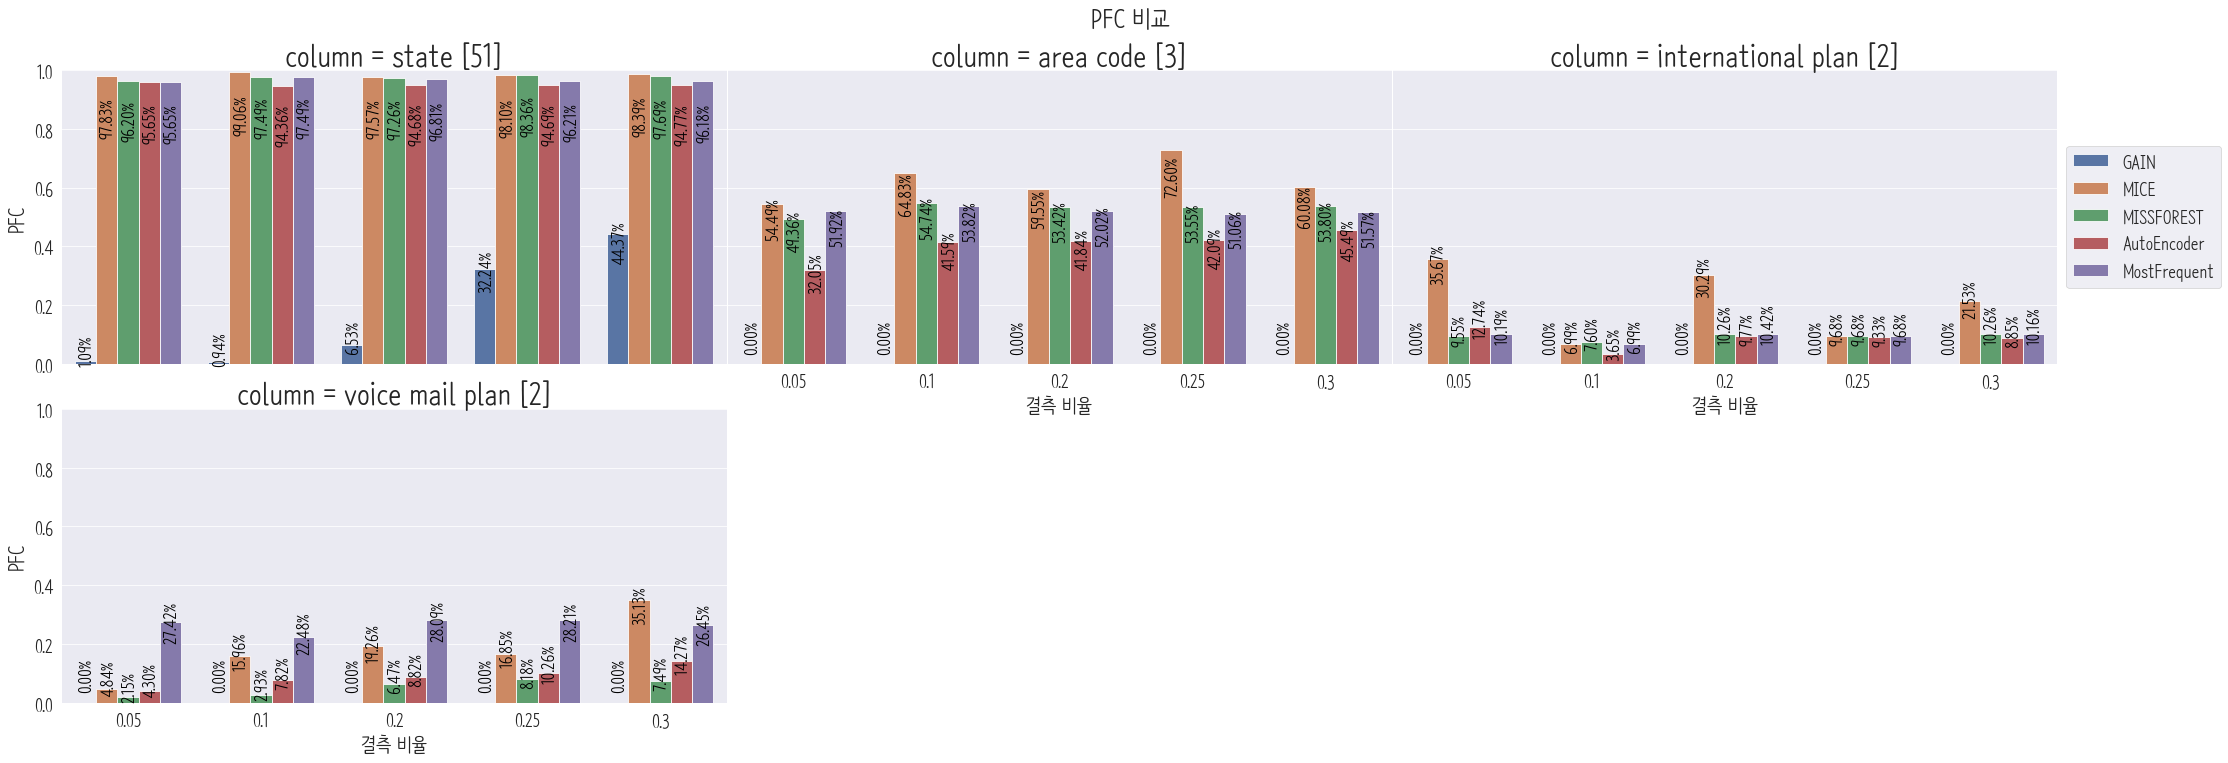
지금 표현하고자 하는 것은
아래 테이블에서 Algo 별로 PFC를 시각화하면서 동시에 시각화할 때 miss별로 나눠서 하고 싶음
barplot 으로 할 경우에 Column 별로 구별해서 보여줄수가 없다.
그래서 찾은 것이 catplot에서 hue 라는 기능이였다.
PFCs2 = PFCs.melt(id_vars= ["column", "miss"], var_name = "Algo", value_name="PFC")
PFCs2.head()
시각화하기
이쁘게 사이즈를 조정하고 싶었는데, seaborn에서 Facetgrid 형태로 하다 보니, 기존에 하던 조정방식이 작동하지 않아서 삽질을 많이 함.
plt.rcParams["font.family"] = 'NanumBarunpen'
plt.rcParams['figure.figsize'] = [20, 20]
sns.set_context("paper", rc={"font.size":20,
                             "axes.titlesize":30,
                             "axes.labelsize":20,
                             'figure.figsize':(20,20)},
                font_scale = 2.0)
ncol = 2
g = sns.catplot(x = "miss", y = "PFC", hue="Algo",
                 data=PFCs2 , ci = None,kind="bar",
                 col = "column",col_wrap = ncol ,legend = False ,height  = 5.5 , aspect =2)
axes = g.axes

for idx , ax in enumerate(axes) :
    ax.set_ylim(0,1)
    column_title = ax.title.get_text() + " [{}]".format(uni[idx])
    ax.set_title(column_title)
    if (idx + 1) % ncol == 0 :
        ax.legend(loc='center left', bbox_to_anchor=(1, 0.5))
g.set_xlabels("결측 비율")
g.fig.subplots_adjust(left = 0.05, bottom = 0.1,
                    right = 0.89 , top = 0.9 ,
                    hspace = 0.1, wspace = 0)
g.fig.suptitle("PFC 비교", fontsize=25)
for i in np.arange(len(axes)):
        ax1 = g.facet_axis(0,i)
        for p in ax1.patches:
            if p.get_height() > 0.11 :
                ax1.text(p.get_x() + 0.03, p.get_height() * .8, '{0:.2f}%'.format(p.get_height()*100 ), color='black',
                         rotation='vertical', size='small')
            elif (p.get_height() < 0.1)  & (p.get_height() > 0 ) :
                ax1.text(p.get_x() + 0.03, 0.05 , '{0:.2f}%'.format(p.get_height()*100 ), color='black',
                         rotation='vertical', size='small')
            elif p.get_height() == 0  :
                ax1.text(p.get_x() + 0.03, 0.05 , '{0:.2f}%'.format(p.get_height()*100 ), color='black',
                         rotation='vertical', size='small' , weight = "bold")

plt.savefig("PFC_Result.png")
catplot을 사용해서 간편하게 하였고, 그림 전차 사이즈나 넓이는 옵션인 height, aspect으로만 조정 가능
그리고 각각의 그림에 ylim을 설정해주고 맨 오른쪽에만 legend를 달게 함.
그리고 기존에 default로 돼있던 title을 ax.title.get_text로 가지고 와서 추가로 붙여준 다음에 다시 title을 부여함.
참고
https://stackoverflow.com/questions/52505002/cant-label-multiple-rows-of-sns-catplot
Can't label multiple rows of sns.catplot()
Here's my source code: plot = sns.catplot(x='Year', y='Graduation Rate', col='Group', hue='Campus', kind='bar', ...
stackoverflow.com
'분석 Python > Visualization' 카테고리의 다른 글
| [ Python ] 2개 모델 확률값 사후 해석 시각화 그려보기 (0) | 2020.01.04 |
|---|---|
| [ Python ] matplotlib tick 값 수정하기 (dir, help) (0) | 2019.12.18 |
| [ Python ] visualization 결과 객체값으로 저장하기 (0) | 2019.11.26 |
| [ Python ] 신뢰구간 시각화하기 (lineplot or fill_between) (0) | 2019.10.31 |
| [ Python ] plotly express facet_row , col scale free 하는 법 공유 (0) | 2019.10.18 |