목차
Introduction
Python에서 문서화를 해볼 때 시도 해본 것을 간단하게 정리해보고자 합니다.
실험했던 코드나 문서화한 파일을 공유합니다.
해당파일을 참고해서 작성해주시길 바랍니다.
여기서는 github과 gitlab에 페이지를 올리는 방법에 대해서 소개한다.
간단한 예제들도 올렸으니, 궁금하신 분들은 확인하시면 될 것 같다.
Github
https://github.com/sungreong/sphinx-test
GitHub - sungreong/sphinx-test: sphinx 테스트 해보기
sphinx 테스트 해보기. Contribute to sungreong/sphinx-test development by creating an account on GitHub.
github.com
https://sungreong.github.io/sphinx-test/build/html/index.html
Welcome to test’s documentation! — test documentation
© Copyright 2022, srlee.
sungreong.github.io
Gitlab
https://gitlab.com/sungreong/sphinx-test
이성령 / sphinx-test
GitLab.com
gitlab.com
파이썬에서 좀 큰 프로젝트를 하다 보면, 라이브러리에 대해서 문서화 작업이 필요한 경우가 있다.
일반적으로 우리가 보는 잘 보는 문서들도 보면 결국 문서화가 다 되어있을 것이다.
그리고 대부분의 문서들도 이 sphinx를 통해서 문서화를 하고 있다.
How to Use Sphinx?
1. 패키지 설치
sudo apt-get install tree
pip install sphinx
pip install sphinx_rtd_them
2. 프로젝트 생성
여기서는 sphinx-test2 라는 폴더를 만들어서 프로젝트로 지정하자.
mkdir sphinx-test2
cd sphinx-test2
3. sphinx docs 생성
sphinx-quickstart docs아래와 같이 물어보는 것에 대해서 사용자에게 맞게 작성해주면 됨.
> Separate source and build directories (y/n) [n] y
> Project name: sphnix test
> Author name(s): srlee
> Project release []:
> Project language [en]:
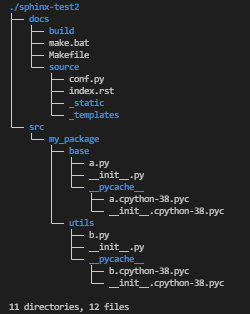
tree로 구조를 보면 다음과 같음.
tree ./sphinx-test2
4. 패키지 추가하기 (optional)
이제 내가 위에 github에 적은 src 폴더를 추가해보자
tree ./sphinx-test2
5. conf.py 수정하기 (docs/source/conf.py)
# import os
# import sys
# sys.path.insert(0, os.path.abspath('.'))
이제 우리가 사용하는 폴더 경로로 맞춰주자.
현재 conf.py 의 경로가 ./sphinx-test2/docs/source.py 에 있고, 내가 새롭게 만든 소스 코드는 ./sphinx-test2/src/my_package이기 때문에, 경로를 2번 내려가고 src/my_package로 연결한다.
import os
import sys
sys.path.insert(0, os.path.abspath('../../src/my_package'))
extensions와 html_theme을 수정해보자.
현재 기존 conf.py가 있으면 아래와 같이 수정해보자.
extensions = []
html_theme = 'alabaster'
수정을 하면 배경도 이쁘게 바뀐다.
extensions = ['sphinx.ext.autodoc']
html_theme = 'sphinx_rtd_theme'
6. Use sphinx-apidoc to generate reStructuredText files from source code
sphinx-apidoc is a tool for automatically generating reStructuredText files from source code, e.g. Python modules. To use it, run
sphinx-apidoc -f -o <path-to-output> <path-to-module>api-doc을 사용해서, rst 파일을 만들어보자.
sphinx-apidoc -f -o docs/source/ src/my_package저걸 실행하면, 이런 rst 파일을 생성합니다.
Creating file docs/source/base.rst.
Creating file docs/source/utils.rst.
Creating file docs/source/modules.rst.

7. Edit index.rst and the generated reStructuredText files
index.rst 파일은 다음과 같다.
.. sphnix test documentation master file, created by
   sphinx-quickstart on Wed Jan 26 22:45:47 2022.
   You can adapt this file completely to your liking, but it should at least
   contain the root `toctree` directive.

Welcome to sphnix test's documentation!
=======================================

.. toctree::
   :maxdepth: 2
   :caption: Contents:


Indices and tables
==================

* :ref:`genindex`
* :ref:`modindex`
* :ref:`search`
Add the modules to the index.rst
모든 모듈을 포함하기 위해서 index.rst에 moudels.rst를 추가한다.
.. sphnix test documentation master file, created by
   sphinx-quickstart on Wed Jan 26 22:45:47 2022.
   You can adapt this file completely to your liking, but it should at least
   contain the root `toctree` directive.

Welcome to sphnix test's documentation!
=======================================

.. toctree::
   :maxdepth: 2
   :caption: Contents:

   modules


Indices and tables
==================

* :ref:`genindex`
* :ref:`modindex`
* :ref:`search`
8. Build the documents
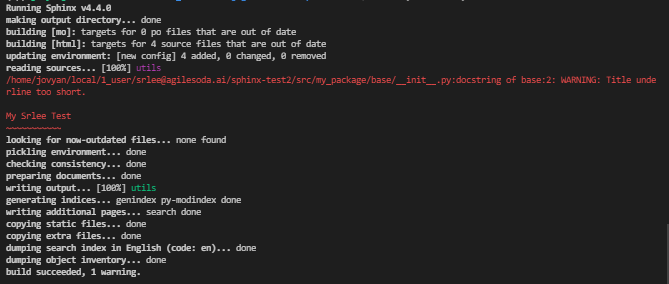
cd docs; make html; cd ..
tree ./sphinx-test2
9. Show html

10. github에 등록하기 위한 작업 진행(index.html , .nojekyll)
docs 폴더 안에 2가지 파일을 만든다. (index.html , .nojekyll)
index.html
<html>
    <head>
      <meta http-equiv="refresh" content="0; url=./build/html/index.html">
    </head>
</html>
.nojekyll
라는 파일을 만든다.

tree ./sphinx-test2./sphinx-test2
├── docs
│ ├── build
│ │ ├── doctrees
│ │ │ ├── base.doctree
│ │ │ ├── environment.pickle
│ │ │ ├── index.doctree
│ │ │ ├── modules.doctree
│ │ │ └── utils.doctree
│ │ └── html
│ │ ├── base.html
│ │ ├── genindex.html
│ │ ├── index.html
│ │ ├── modules.html
│ │ ├── objects.inv
│ │ ├── py-modindex.html
│ │ ├── search.html
│ │ ├── searchindex.js
│ │ ├── _sources
│ │ │ ├── base.rst.txt
│ │ │ ├── index.rst.txt
│ │ │ ├── modules.rst.txt
│ │ │ └── utils.rst.txt
│ │ ├── _static
│ │ │ ├── basic.css
│ │ │ ├── css
│ │ │ │ ├── badge_only.css
│ │ │ │ ├── fonts
│ │ │ │ │ ├── fontawesome-webfont.eot
│ │ │ │ │ ├── fontawesome-webfont.svg
│ │ │ │ │ ├── fontawesome-webfont.ttf
│ │ │ │ │ ├── fontawesome-webfont.woff
│ │ │ │ │ ├── fontawesome-webfont.woff2
│ │ │ │ │ ├── lato-bold-italic.woff
│ │ │ │ │ ├── lato-bold-italic.woff2
│ │ │ │ │ ├── lato-bold.woff
│ │ │ │ │ ├── lato-bold.woff2
│ │ │ │ │ ├── lato-normal-italic.woff
│ │ │ │ │ ├── lato-normal-italic.woff2
│ │ │ │ │ ├── lato-normal.woff
│ │ │ │ │ ├── lato-normal.woff2
│ │ │ │ │ ├── Roboto-Slab-Bold.woff
│ │ │ │ │ ├── Roboto-Slab-Bold.woff2
│ │ │ │ │ ├── Roboto-Slab-Regular.woff
│ │ │ │ │ └── Roboto-Slab-Regular.woff2
│ │ │ │ └── theme.css
│ │ │ ├── doctools.js
│ │ │ ├── documentation_options.js
│ │ │ ├── file.png
│ │ │ ├── jquery-3.5.1.js
│ │ │ ├── jquery.js
│ │ │ ├── js
│ │ │ │ ├── badge_only.js
│ │ │ │ ├── html5shiv.min.js
│ │ │ │ ├── html5shiv-printshiv.min.js
│ │ │ │ └── theme.js
│ │ │ ├── language_data.js
│ │ │ ├── minus.png
│ │ │ ├── plus.png
│ │ │ ├── pygments.css
│ │ │ ├── searchtools.js
│ │ │ ├── underscore-1.13.1.js
│ │ │ └── underscore.js
│ │ └── utils.html
│ ├── index.html # (추가)
│ ├── make.bat
│ ├── Makefile
│ └── source
│ ├── base.rst
│ ├── conf.py
│ ├── index.rst
│ ├── modules.rst
│ ├── _static
│ ├── _templates
│ └── utils.rst
└── src
└── my_package
├── base
│ ├── a.py
│ ├── __init__.py
│ └── __pycache__
│ ├── a.cpython-38.pyc
│ └── __init__.cpython-38.pyc
└── utils
├── b.py
├── __init__.py
└── __pycache__
├── b.cpython-38.pyc
└── __init__.cpython-38.pyc
Github Pages 등록하기
https://blog.naver.com/pjt3591oo/222067596734
여러가지를 찾아보면서 가장 좋았던 블로그는 위의 블로그여서 참고하시길 바란다.
참고로 github에서는 private 한 버전에서는 돈을 내야 한다.
그래서 public 버전으로 진행하고자 한다.
Github에서 Page 만들어보기
일단 가정은 github에 저 폴더를 올려보자.

이런 식으로 들어간다
한 프로젝트 내에서 [Settings]를 들어가서, [Pages]를 들어간다.

여기서는 sphinx-test로 보여준다.
branch를 선택하고 docs라는 폴더를 선택하고 일정시간이 지나면 html이 뜨게 된다!

site 열기

더 디테일한 내용이 많이 있겠지만, 많이 경험을 해보고 더 추가하던지 해야겠다.
Gitlab
gitlab에서도 할 수 있는 방법을 공유한다.
gitlab은 github과는 다르게 private한 버전에서도 가능하다.
기존에 만든 거 그냥 사용하면 된다.
여기서는 ci를 이용해서 public에 올리고, 그걸 가지고 와서, 사용하면 된다.
.gitlab-ci.yml 만들기
다양한 방법으로 할 수 있지만, 여기서는 가장 간단한 방법으로 만든 html을 이용해서 하는 방법으로 하게 됬다.
ci를 통해서 docs/build/html에 있는 파일을 public 플더로 옮기는 script를 작성한다.
그러면 push할 때마다 ci가 돌고 그러면 아래 url로 접근할 수 있다.
image: python:3.8-alpine

pages:
  stage: deploy
  script:
    - mv docs/build/html/ public/
  artifacts:
    paths:
      - public
사이트 연결하기
여기서 나의 gitlab에 들어갈 수 있는 것을 알 수 있다.

Reference
https://blog.naver.com/pjt3591oo/222067596734
[문서화] 개발자가 싫어하는 문서화하기 1편 - Sphinx
안녕하세요. 멍개입니다. 이번 포스팅의 주제는 개발자가 정말정말 싫어하는 문서화!!!를 2편에 나눠 다뤄...
blog.naver.com
https://shunsvineyard.info/2019/09/19/use-sphinx-for-python-documentation/
Using Sphinx for Python Documentation - Shun's Vineyard
[Updated: January 14, 2021] As a developer, we all know the importance of code documenting: Good code is not only self-explanatory but also well-documented. However, we also struggle with keeping documents up to date, especially if we maintain the source c
shunsvineyard.info
A Simple Tutorial on How to document your Python Project using Sphinx and Rinohtype
Documenting code is one of the tasks I really don’t want to do, but I’ll do it for the grades anyway.
medium.com
'분석 Python > 구현 및 자료' 카테고리의 다른 글
| Python) 기념일 관리하기 및 구글 캘린더에 등록할 템플릿 만드는 코드 (0) | 2022.02.12 |
|---|---|
| Python) Permutation Importance 다양하게 표현하는 방법 (0) | 2022.01.31 |
| Python) featuretools를 사용한 자동 변수 생성 (0) | 2022.01.22 |
| Python) most frequent speed test (0) | 2021.12.24 |
| 선형 Kalman Filtering 알아보기 (0) | 2021.10.08 |