기존에 알다시피 Pytorch 같은 경우 아키텍처를 저장을 할 수가 없었다.
torch.save를 이용해서 저장하면 에러가 생기는 문제가 있다.
그래서 보통은 아키텍처를 좀 더 일반화해서 만들고, 파라미터를 넣은 다음에 학습된 가중치를 불러와서 모델을 로드하는 방식을 주로 사용한다. 참고

오늘은 우연히 발표를 듣다가 알게 된 사실을 공유한다.
바로 torch.jit.save & load를 알게 된 것이다.
내가 알기로는 아마 이것은 torch 1.6부터 나온 것으로 알고 있다.
실제 애가 어떻게 저장을 하는지는 잘 모르지만, torch.jit.save를 사용하면, 가중치와 함께 아키텍처를 둘 다 저장할 수 있다!
그래서 일단 예제를 보자. 회귀 분석 예측을 아주 간단하게 해 보자.
여기서의 목적은 가중치가 저장하기 전과 후가 똑같은 지와 결과가 동일하게 나오는지를 중점적으로 보는 것으로 한다.
from sklearn.datasets import load_boston
import torch
d = load_boston()
x, y= d["data"] , d["target"]
x_tensor , y_tensor = torch.FloatTensor(x) , torch.FloatTensor(y.reshape(-1,1))
criterion = torch.nn.MSELoss()
실제로 추론을 할 때, 좀 말이 나오는 것이 바로 dropout과 batch normalization이다.
이것들이 과연 잘 반영이 되는지 확인해보자.
import io
from torch import nn
import torch
class net(torch.nn.Module):
    def __init__(self,) :
        super(net,self).__init__()
        self.layer = nn.Linear(x.shape[1],5)
        self.bn = nn.BatchNorm1d(5)
        self.layer1 = nn.Linear(5,1)
        self.dropout = nn.Dropout(0.4)
    def forward(self, x):
        x = self.bn(self.layer(x))
        x = self.layer1(self.dropout(x))
        return x
초기 파라미터는 다음과 같다.
net_ = net()
net_.state_dict()

OrderedDict([('layer.weight',
              tensor([[ 0.1071, -0.1898,  0.0500,  0.2257, -0.1546,  0.2155,  0.2477,  0.0868,
                       -0.0775, -0.0808,  0.0794, -0.0649, -0.0317],
                      [-0.0698, -0.0483, -0.2751,  0.1608, -0.0380, -0.0472, -0.0434,  0.2323,
                       -0.2528, -0.2723, -0.1041,  0.0116, -0.1129],
                      [-0.2206,  0.2616,  0.1458, -0.0773, -0.1563, -0.2764,  0.0600, -0.1410,
                       -0.0723,  0.1424,  0.0264, -0.1397,  0.0488],
                      [-0.2204,  0.0038,  0.2547,  0.1885,  0.2437,  0.1270,  0.0304, -0.1852,
                       -0.0050,  0.0123, -0.0030,  0.2363, -0.1298],
                      [ 0.0046, -0.1179,  0.1944, -0.2462, -0.0570,  0.1633,  0.1704, -0.0294,
                        0.1525,  0.1466,  0.1849,  0.1756,  0.0304]])),
             ('layer.bias',
              tensor([ 0.0006, -0.0497, -0.0431,  0.2709,  0.2270])),
             ('bn.weight', tensor([1., 1., 1., 1., 1.])),
             ('bn.bias', tensor([0., 0., 0., 0., 0.])),
             ('bn.running_mean', tensor([0., 0., 0., 0., 0.])),
             ('bn.running_var', tensor([1., 1., 1., 1., 1.])),
             ('bn.num_batches_tracked', tensor(0)),
             ('layer1.weight',
              tensor([[ 0.0009,  0.3760, -0.4044, -0.0736,  0.0385]])),
             ('layer1.bias', tensor([0.0574]))])
optimizer = torch.optim.Adam(net_.parameters(), lr=1e-3) ## gradient descent y_pred = net_(x_tensor) loss = criterion(y_pred , y_tensor) optimizer.zero_grad() loss.backward() optimizer.step()
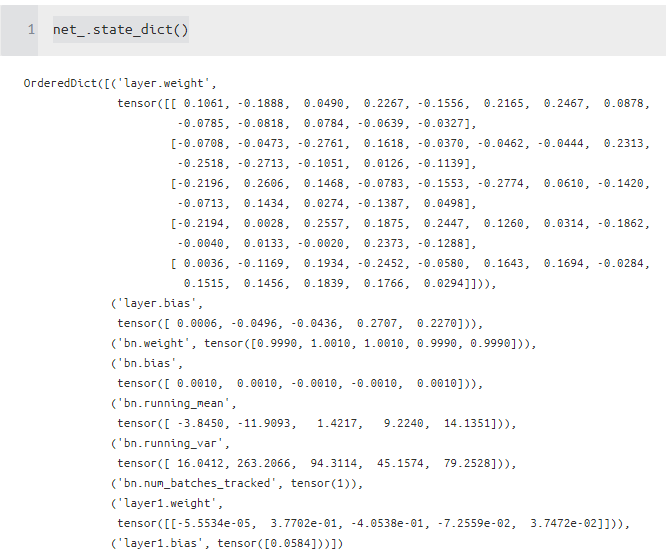
학습된 파라미터는 다음과 같다.
실제로 저장하고 나서도 동일한지 확인을 해보자.
net_.state_dict()

OrderedDict([('layer.weight',
              tensor([[ 0.1061, -0.1888,  0.0490,  0.2267, -0.1556,  0.2165,  0.2467,  0.0878,
                       -0.0785, -0.0818,  0.0784, -0.0639, -0.0327],
                      [-0.0708, -0.0473, -0.2761,  0.1618, -0.0370, -0.0462, -0.0444,  0.2313,
                       -0.2518, -0.2713, -0.1051,  0.0126, -0.1139],
                      [-0.2196,  0.2606,  0.1468, -0.0783, -0.1553, -0.2774,  0.0610, -0.1420,
                       -0.0713,  0.1434,  0.0274, -0.1387,  0.0498],
                      [-0.2194,  0.0028,  0.2557,  0.1875,  0.2447,  0.1260,  0.0314, -0.1862,
                       -0.0040,  0.0133, -0.0020,  0.2373, -0.1288],
                      [ 0.0036, -0.1169,  0.1934, -0.2452, -0.0580,  0.1643,  0.1694, -0.0284,
                        0.1515,  0.1456,  0.1839,  0.1766,  0.0294]])),
             ('layer.bias',
              tensor([ 0.0006, -0.0496, -0.0436,  0.2707,  0.2270])),
             ('bn.weight', tensor([0.9990, 1.0010, 1.0010, 0.9990, 0.9990])),
             ('bn.bias',
              tensor([ 0.0010,  0.0010, -0.0010, -0.0010,  0.0010])),
             ('bn.running_mean',
              tensor([ -3.8450, -11.9093,   1.4217,   9.2240,  14.1351])),
             ('bn.running_var',
              tensor([ 16.0412, 263.2066,  94.3114,  45.1574,  79.2528])),
             ('bn.num_batches_tracked', tensor(1)),
             ('layer1.weight',
              tensor([[-5.5534e-05,  3.7702e-01, -4.0538e-01, -7.2559e-02,  3.7472e-02]])),
             ('layer1.bias', tensor([0.0584]))])


아마 우리가 추론을 할 때 얻고자 하는 값은 맨 오른쪽 값일 것이다.
자 이제부터 torch.jit을 사용해서 저장해보자
추가적으로 extra_files를 이용해서 특정 string을 저장할 수 있다.
아마 이것을 사용해서 특정 모델의 패스를 저장하여, 불러오는데도 사용이 가능해 보이니 기억해두면 좋을 것 같다.
torch.jit.save
m = torch.jit.script(net_)
extra_files = torch._C.ExtraFilesMap()
extra_files['txt1'] = "txt1"
extra_files['path'] = "path1"
with torch.no_grad() :
    torch.jit.save(m, './scriptmodule.pt', _extra_files=extra_files)
torch.jit.load
extra_files = torch._C.ExtraFilesMap()
extra_files['txt1'] = ""
extra_files['path'] = ""
loaded_model = torch.jit.load('./scriptmodule.pt', _extra_files=extra_files)
loaded_model.state_dict()

OrderedDict([('layer.weight',
              tensor([[ 0.1061, -0.1888,  0.0490,  0.2267, -0.1556,  0.2165,  0.2467,  0.0878,
                       -0.0785, -0.0818,  0.0784, -0.0639, -0.0327],
                      [-0.0708, -0.0473, -0.2761,  0.1618, -0.0370, -0.0462, -0.0444,  0.2313,
                       -0.2518, -0.2713, -0.1051,  0.0126, -0.1139],
                      [-0.2196,  0.2606,  0.1468, -0.0783, -0.1553, -0.2774,  0.0610, -0.1420,
                       -0.0713,  0.1434,  0.0274, -0.1387,  0.0498],
                      [-0.2194,  0.0028,  0.2557,  0.1875,  0.2447,  0.1260,  0.0314, -0.1862,
                       -0.0040,  0.0133, -0.0020,  0.2373, -0.1288],
                      [ 0.0036, -0.1169,  0.1934, -0.2452, -0.0580,  0.1643,  0.1694, -0.0284,
                        0.1515,  0.1456,  0.1839,  0.1766,  0.0294]])),
             ('layer.bias',
              tensor([ 0.0006, -0.0496, -0.0436,  0.2707,  0.2270])),
             ('bn.weight', tensor([0.9990, 1.0010, 1.0010, 0.9990, 0.9990])),
             ('bn.bias',
              tensor([ 0.0010,  0.0010, -0.0010, -0.0010,  0.0010])),
             ('bn.running_mean',
              tensor([ -8.4023, -22.4967,  -2.0176,  26.4099,  34.4679])),
             ('bn.running_var',
              tensor([ 16.3219, 227.6348,  85.1394,  36.8022,  68.7590])),
             ('bn.num_batches_tracked', tensor(3)),
             ('layer1.weight',
              tensor([[-5.5534e-05,  3.7702e-01, -4.0538e-01, -7.2559e-02,  3.7472e-02]])),
             ('layer1.bias', tensor([0.0584]))])


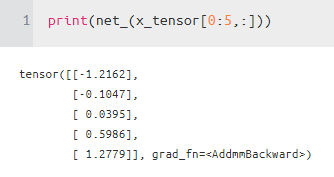
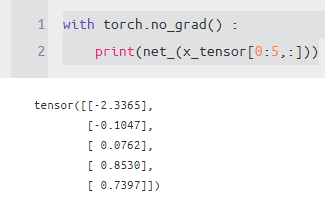
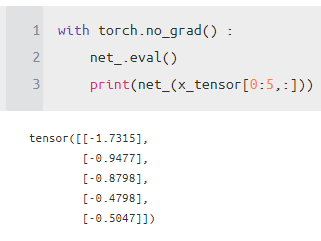
추론 결과를 살펴보자. 여기서 신기한 것은 다음과 같다.
실제 저장할 때 모델은 eval 상태로 torch.no_grad를 한 상태로 저장을 하면, 로딩된 모델은 바로 그 값이 적용된다는 것이다!!!
깜빡하기 쉬운 것인데, 저장을 어떻게 하냐에 따라서 바로 사용할 수 있어서 편리한 것 같다.


이렇게 torch 도 점점 발전이 되고 있어서, 기존에 안 되는 단점들을 해결해나가고 있다.
듣은 바로는 torch_serve라는 것도 개발을 하고 있고, torch 뿐만이 아니라 다른 프레임워크도 되는 일반화된 서빙 시스템으로 들어서 언젠가는 공부를 해야겠다고 생각은 든다.
참고) 여기서 사용하는 TorchScript를 쓰면은 파이썬 없이 c++에서도 torch 모델을 로드할 수 있다고 함. 아래 참
Reference
what is the right usage of _extra_files arg in torch.jit.save
one option I tried is pickling vocab and saving with extrafiles arg import torch import pickle class Vocab(object): pass vocab = Vocab() pickle.dump(open('path/to/vocab.pkl','w')) m = torc...
stackoverflow.com
https://pytorch.org/docs/stable/generated/torch.jit.load.html
torch.jit.load — PyTorch 1.7.0 documentation
Shortcuts
pytorch.org
tutorials.pytorch.kr/beginner/Intro_to_TorchScript_tutorial.html
TorchScript 소개 — PyTorch Tutorials 1.6.0 documentation
Note Click here to download the full example code TorchScript 소개 Author: James Reed (jamesreed@fb.com), Michael Suo (suo@fb.com), rev2 번역: 강준혁 이 튜토리얼은 C++와 같은 고성능 환경에서 실행될 수 있는 PyTorch 모델(nn.Mod
tutorials.pytorch.kr
colab.research.google.com/drive/1HiICg6jRkBnr5hvK2-VnMi88Vi9pUzEJ#scrollTo=1aMIZ1P28LMM
Google Colaboratory
colab.research.google.com
'분석 Python > Pytorch' 카테고리의 다른 글
| [TIP / Pytorch] torch class name 얻는 방법 (0) | 2020.10.31 |
|---|---|
| [TIP / Pytorch] calculate convolution output shae (conv2d , pooling) (Conv 아웃풋 값 (0) | 2020.10.31 |
| [TIP / Installation] requirements.txt 로 pytorch package 설치하는 방법 (1) | 2020.10.25 |
| [TIP / Pytorch] Linear NN Model base Architecture (0) | 2020.10.23 |
| [Pytorch] Regression 관련 자료 (0) | 2020.09.29 |