해당 내용은 조코딩님의 영상을 따라 해보면서 진행하였다.
그래서 대부분의 작업은 조코딩님이 하셨던 것처럼 진행하면 정상적으로 잘 될 것이다.
https://www.youtube.com/watch?v=tPqTE14DEUg&ab_channel=%EC%A1%B0%EC%BD%94%EB%94%A9JoCoding
회원가입
- 회원 가입을 하게 되면 사용자는 db에 email, password 등 기타 정보를 입력하게 되는데, 그 정보들은 결국 DB에 저장이 된다.

로그인
- 회원가입을 통해 해당 정보를 DB에 저장을 하게 되면, DB에서 사용자에게 특정 토큰을 부여하게 된다.

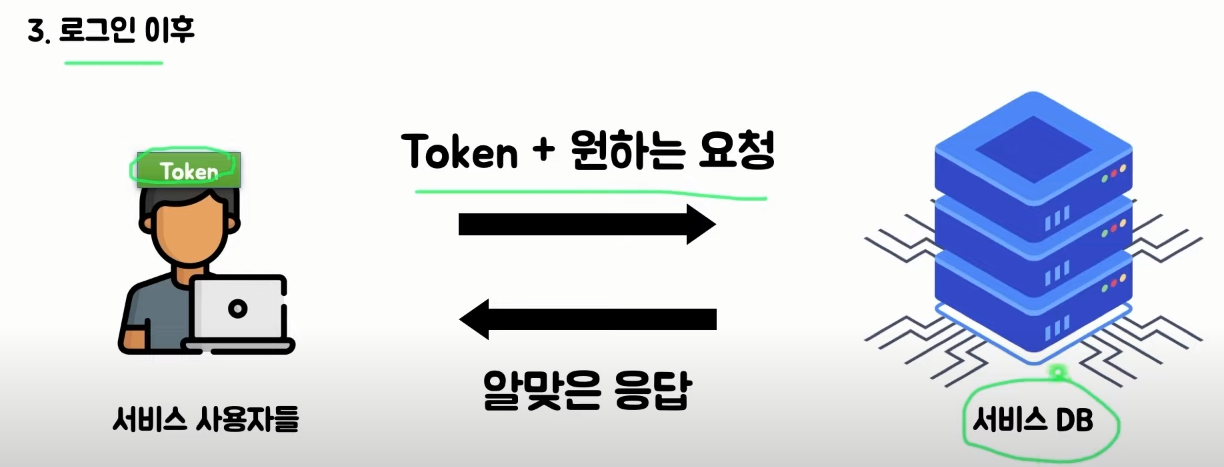
로그인 이후 응답
- 로그인 이후 사용자는 특정 토큰을 갖게 되고, 웹이나 앱에서 원하는 요청을 할 때 가지고 있던 Token과 같이 전달하게 되면 DB에서는 Token으로 사용자 여부를 확인해서 응답을 보내게 되는 구조라고 한다.
- 개발자도구 (Command + Shift + C)
- 네트워크(Network)
- 검색했던 것들을 기록됨.
- 토큰을 포함해서 보여줌 → 헤더(요청헤더) → 쿠키로 되어 있음
- 토큰은 암호화되어 있음.
- 네트워크(Network)
파이어베이스

https://firebase.google.com/?hl=ko
Firebase
Firebase는 고품질 앱을 빠르게 개발하고 비즈니스를 성장시키는 데 도움이 되는 Google의 모바일 플랫폼입니다.
firebase.google.com
파이어베이스(Firebase란)
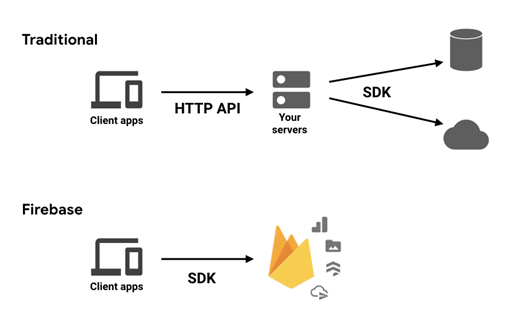
‘파이어베이스’는 구글(Google)이 소유하고 있는 모바일 애플리케이션 개발 플랫폼
파이어베이스는 “앱을 개발하고, 개선하고, 키워갈 수 있는” 도구 모음(toolset)이며, 이러한 도구가 없다면 개발자들은 일반적으로 서비스의 상당 부분을 직접 만들어내야만 합니다. 그런데 개발자들은 앱의 사용자 경험(UX)에 집중을 해야 하기 때문에, 그런 세세한 부분들까지 전부 만드는 걸 좋아하지 않습니다. 그런 부분들로는 분석, 인증, 데이터베이스, 구성 설정, 파일 저장, 푸시(push) 메시지 등, 열거하자면 끝이 없습니다. 파이어베이스로 만든 이러한 서비스들이 클라우드에 호스팅 되면, 개발자의 입장에서는 거의 아무런 노력을 들이지 않고도 앱의 규모를 확장할 수 있습니다.
파이어 베이스 기능
- 인증(Authentication): 사용자 로그인 및 ID 관리
- 클라우드 함수(Cloud Functions): 서버 없이 이벤트 위주로 동작하는 백엔드
- 클라우드 파이어스토어(Cloud Firestore): 클라우드에 호스팅 된 실시간의 비관계형(NoSQL) 데이터베이스
- 클라우드 스토리지(Cloud Storage): 거대하게 확장할 수 있는 파일 스토리지
- 파이어베이스 호스팅(Firebase Hosting): 전 세계를 대상으로 한 웹 호스팅
- 머신러닝 키트(ML Kit): 일반적인 머신러닝(ML) 작업을 위한 SDK
- 실시간 데이터베이스(Realtime Database): 클라우드에 호스팅 된 실시간의 비관계형(NoSQL) 데이터베이스
즉 내가 이해한 개념은 조금 더 개발자가 개발하기 쉽게 만든 툴정도....
서버도 구글에서 관리하고 sdk나 머 그런 코드들도 다 만들어줘서 훨씬 빠르게 개발할 수 있다는 느낌...
코드
이제 개념이나 장점은 추후에 알아보고, 조코딩 유튜브를 보면서 로그인하는 코드를 따라 쳐봤다.
일단 해야 할 일
1. vscode 설치
2. vscode 내에서 extension 설치
- Liver Server
vscode를 통해서 html을 간단하게 만들고 그 안에서 구현을 해보고자 한다.
프로젝트를 만들고 이번에 할 것은 인증을 하는 것이기 때문에 Authentication에서 새 제공업체를 추가해서 이메일/비밀번호에 대한 코드를 얻자.

그리고 설명을 따라가 보다가 config를 복사하는 것을 깜빡하면 해당 프로젝트 내에서 firbase config를 얻기 위해서
프로젝트 개요 -> 톱니바퀴 -> 프로젝트 설정으로 들어가서 config와 import 하는 코드를 얻는다.

그다음에는 대충 내가 이해한 것은 form을 만들고 버튼을 만든 다음에 그 버튼을 이용해서 event를 발생시키게 하고, 그 이벤트를 발생시킬 때 특정 처리를 하는 것으로 이해했다.
그럼 아래와 같은 코드를 얻게 된다.
필자는 추가로 구글 로그인하는 기능을 추가했다.
대충 이런 화면을 얻게 될 수 있다.
http://127.0.0.1:5501/login.html (로컬 개발)

주의 사항
구글 로그인 같은 경우 auth 인증이 안되는 머 어쩌고저쩌고 로컬에서 개발하면 뜰 수도 있다.
이는 도메인을 추가하지 않아서 생기는 문제로 승인된 도메인에 도메인을 추가하면 된다.

아래는 전체 풀코드이다.
<!DOCTYPE html>
<html lang="ko">

<head>
    <meta charset="UTF-8">
    <meta http-equiv="X-UA-Compatible" content="IE=edge">
    <meta name="viewport" content="width=device-width, initial-scale=1.0">
    <title>login</title>
</head>

<body>
    <form>
        <h1>회원가입</h1>
        <div> email : <input type="email" id="signUpEmail" /> </div>
        <div> password : <input type="password" id="signUpPassword" /> </div>
        <button type="submit" id="signUpButton">회원가입 하기</button>
        <button>로그인 하러 가기</button>
    </form>
    <form>
        <h1>로그인</h1>
        <div> email : <input type="email" id="signInEmail" /> </div>
        <div> password : <input type="password" id="signInPassword" /> </div>
        <button type="submit" id="signInButton">로그인 하기</button>
        <button>회원가입 하러 가기</button>
    </form>
    <form>
        <h1> 구글 로그인</h1>
        <button type="submit" id="signInGoogleButton">구글 아이디로 로그인 하기</button>
        <button type="submit" id="signOutGoogleButton">로그아웃 하기</button>
    </form>

    <script type="module">
        // Import the functions you need from the SDKs you need
        import { initializeApp } from "https://www.gstatic.com/firebasejs/9.17.2/firebase-app.js";
        import { getAnalytics } from "https://www.gstatic.com/firebasejs/9.17.2/firebase-analytics.js";
        // TODO: Add SDKs for Firebase products that you want to use
        // https://firebase.google.com/docs/web/setup#available-libraries

        // Your web app's Firebase configuration
        // For Firebase JS SDK v7.20.0 and later, measurementId is optional
        // 사용자의 config를 넣기
        const firebaseConfig = {
            apiKey: "##",
            authDomain: ##",
            projectId: "##",
            storageBucket: "##",
            messagingSenderId: "##",
            appId: "##",
            measurementId: ##"
        };

        // Initialize Firebase
        const app = initializeApp(firebaseConfig);
        const analytics = getAnalytics(app);
        import { getAuth, createUserWithEmailAndPassword, signInWithEmailAndPassword } from "https://www.gstatic.com/firebasejs/9.17.2/firebase-auth.js";
        const auth = getAuth();
        document.getElementById('signUpButton').addEventListener('click', (event) => {
            event.preventDefault()
            const signUpEmail = document.getElementById('signUpEmail').value
            const signUpPassword = document.getElementById('signUpPassword').value
            createUserWithEmailAndPassword(auth, signUpEmail, signUpPassword)
                .then((userCredential) => {
                    console.log(userCredential)
                    // Signed in
                    const user = userCredential.user;
                    // ...
                })
                .catch((error) => {
                    console.log(error)
                    const errorCode = error.code;
                    const errorMessage = error.message;
                    // ..
                });
        })
        document.getElementById('signInButton').addEventListener('click', (event) => {

            event.preventDefault()
            const signInEmail = document.getElementById('signInEmail').value
            const signInPassword = document.getElementById('signInPassword').value
            signInWithEmailAndPassword(auth, signInEmail, signInPassword)
                .then((userCredential) => {
                    // Signed in
                    console.log(userCredential)
                    const user = userCredential.user;
                    // ...
                })
                .catch((error) => {
                    console.log("로그인실패")
                    const errorCode = error.code;
                    const errorMessage = error.message;
                });

        })
        // 구글 로그인
        import { getRedirectResult, GoogleAuthProvider, signInWithPopup, signOut } from "https://www.gstatic.com/firebasejs/9.17.2/firebase-auth.js";
        const provider = new GoogleAuthProvider();
        provider.addScope('https://www.googleapis.com/auth/contacts.readonly');
        provider.setCustomParameters({
            'login_hint': 'user@example.com'
        });
        document.getElementById('signInGoogleButton').addEventListener('click', (event) => {
            event.preventDefault()
            // 구글 인증 기능 추가
            signInWithPopup(auth, provider)
                .then((result) => {
                    console.log("구글 로그인 완료")
                    // This gives you a Google Access Token. You can use it to access the Google API.
                    const credential = GoogleAuthProvider.credentialFromResult(result);
                    const token = credential.accessToken;
                    // The signed-in user info.
                    const user = result.user;
                    // ...
                }).catch((error) => {
                    console.log("구글 로그인 실패")
                    // Handle Errors here.
                    const errorCode = error.code;
                    const errorMessage = error.message;
                    // The email of the user's account used.
                    const email = error.customData.email;
                    // The AuthCredential type that was used.
                    const credential = GoogleAuthProvider.credentialFromError(error);
                    // ...
                });
        })
        document.getElementById('signOutGoogleButton').addEventListener('click', (event) => {
            event.preventDefault()
            // 구글 인증 기능 추가
            signOut(auth).then(() => {
                console.log("구글 아이디 로그아웃 성공")
                // Sign-out successful.
            }).catch((error) => {
                // An error happened.
                console.log("구글 아이디 로그아웃 실패")
            });
        })
        console.log("hello world")
        console.log(app)
    </script>
</body>

</html>
간단하게 Firebase로그인하는 방법에 대해서 알아봤다.
그래도 생각했던 것보다는 인터넷에 자료가 많고 예시도 잘 나와 있어서 익숙해지면 언젠가 쓸 일이 있지 않을까 싶다.
파이어베이스(Firebase)란 무엇인가? 파이어베이스 심층 탐구 : 중편
파이어베이스의 도움을 받아 만들 수 있는 앱의 종류에는 사실상 제한이 없습니다. 파이어베이스를 사용할 수 있는 플랫폼에만 제한이 있을 뿐입니다. 파이어베이스의 SDK가 주로 염두에 두고
blog.wishket.com